Appearance
Orders
Orders can be created in two ways: automatically when a customer completes checkout, or manually from the admin panel when a sale happens off-platform (Instagram DMs, WhatsApp, phone, in person). From the admin panel you can view every order, create manual ones, inspect details, and update statuses — each status change can trigger an email notification to the customer.
Browsing orders
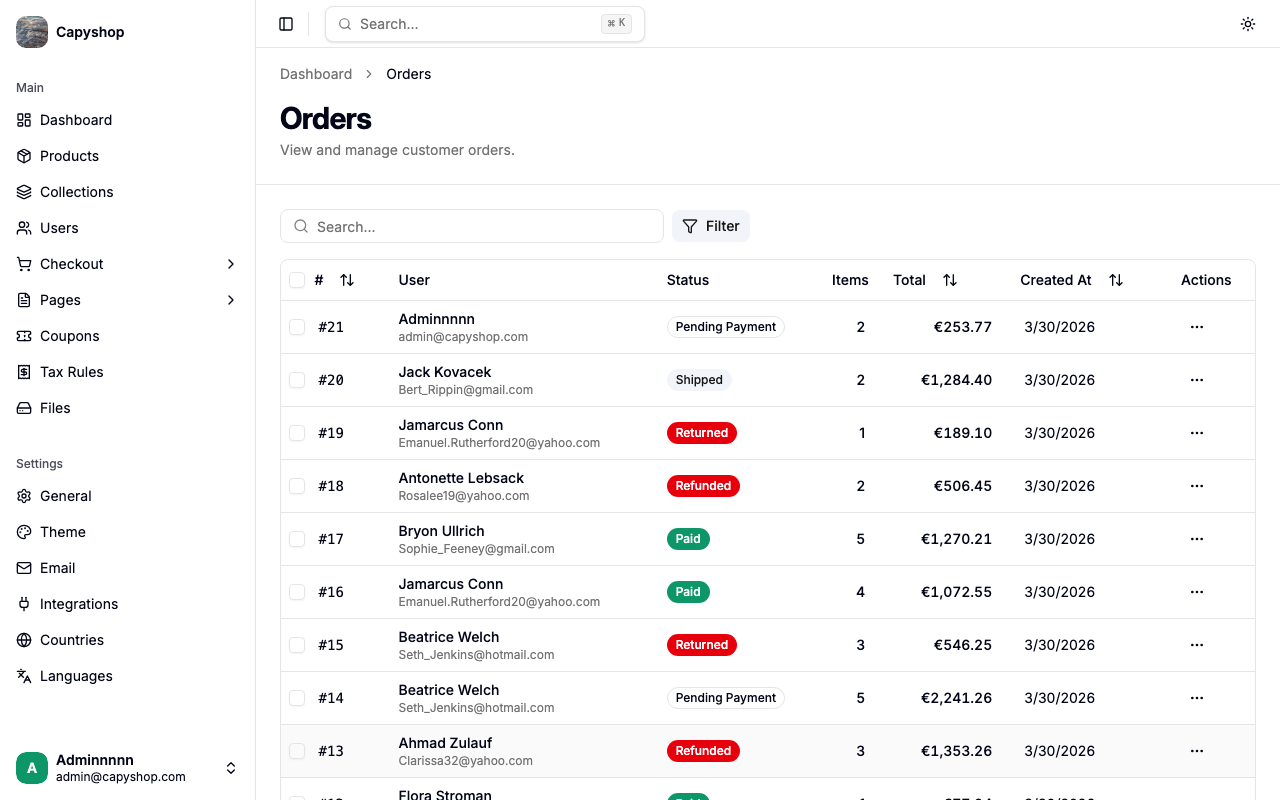
Open Orders in the admin sidebar to see the full order list. The table displays each order's number, customer, status, item count, total, and creation date.
| Column | Description |
|---|---|
| Order Number | Unique auto-incrementing number (click to view details) |
| User | Customer name and email |
| Status | Current order status displayed as a colored badge |
| Items | Number of products in the order |
| Total | Order total in your store currency |
| Created At | Date the order was placed |
You can sort by clicking the Order Number, Total, or Created At column headers. Use the search bar to find orders by order number or customer name/email. The Status filter lets you narrow results to a specific status, the User filter lets you search for a specific customer's orders, and the Source filter separates Online (checkout) from Manual orders.
Manual orders for walk-in or cash customers without a real email on file show an Offline customer badge in place of the email address, so you can tell at a glance which orders won't trigger customer notifications.
Exporting orders
Click the Export Orders button at the top of the orders list to download the current view as a CSV file. The export respects active filters and search — only the rows you can see in the list are included, so you can scope the export to a single status, a date range, a specific customer, or only manual orders.
Use this for accounting handoffs, marketplace reconciliation, or feeding orders into an external fulfillment system.
Creating a manual order
Click Create manual order on the orders list to record a sale that happened off-platform. A manual order works exactly like a checkout order — stock is decremented, totals are calculated, and the customer can optionally receive a confirmation email — but you control every field yourself.
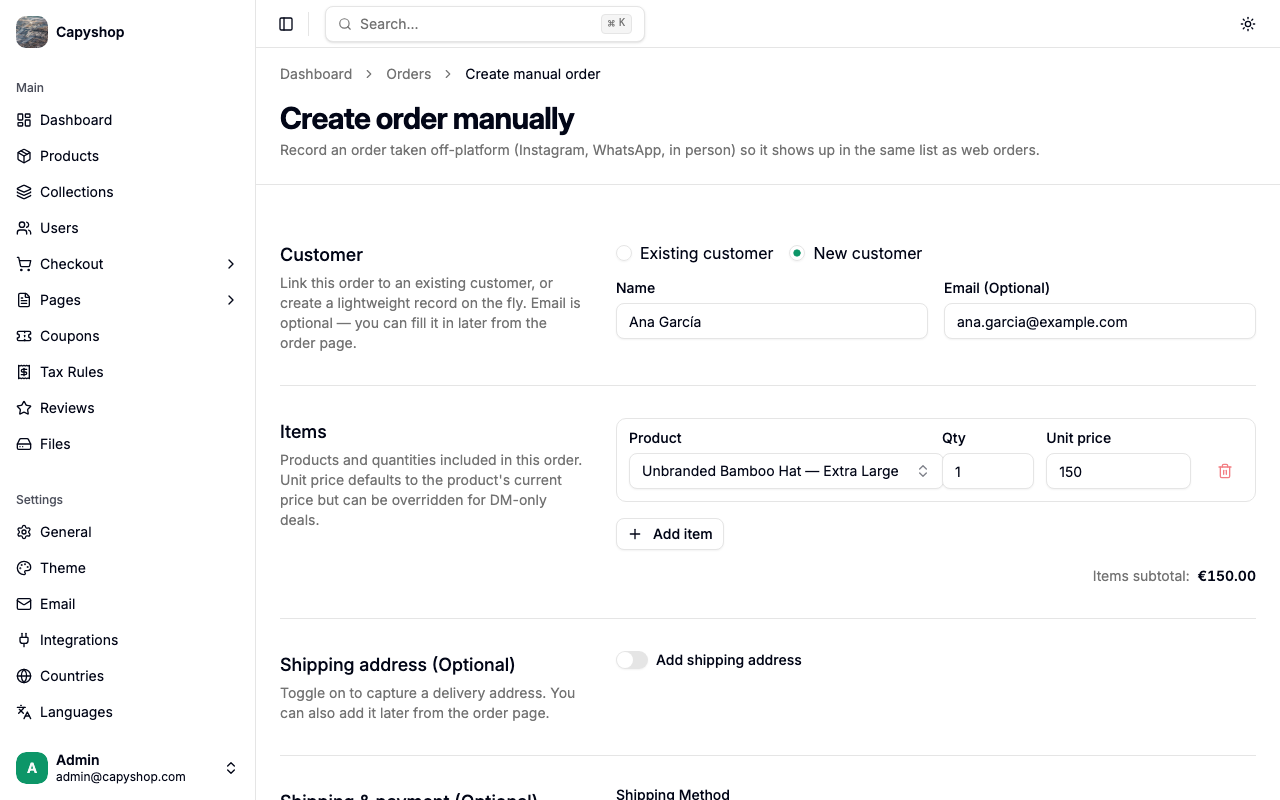
Step 1 — Choose a customer
Pick between two options at the top of the form:
- Existing customer — search by name or email and select a user who already exists in your store.
- New customer — provide a Name (required). Email (Optional) can be left blank for walk-in or cash sales where you don't have contact info; in that case the system creates a lightweight user with a placeholder email so no confirmation email is sent.
Tip: If the same email is later used to create a real account, the two will be linked automatically.
Step 2 — Add items
Each line has Product, Qty, and Unit price. Selecting a product auto-fills its current price, which you can override for DM-only deals. Click + Add item to add more lines.
Important: Products with variants must be added as a specific variant, not as the parent product. Items are locked after the order is created — if you need to change items, cancel the order and create a new one.
Step 3 — Shipping address (optional)
Toggle Add shipping address on if you want to capture a delivery address. When enabled, Name, Street, Zip, and Country are required; Phone, State, and City are optional. You can skip this step entirely and add an address later from the order page.
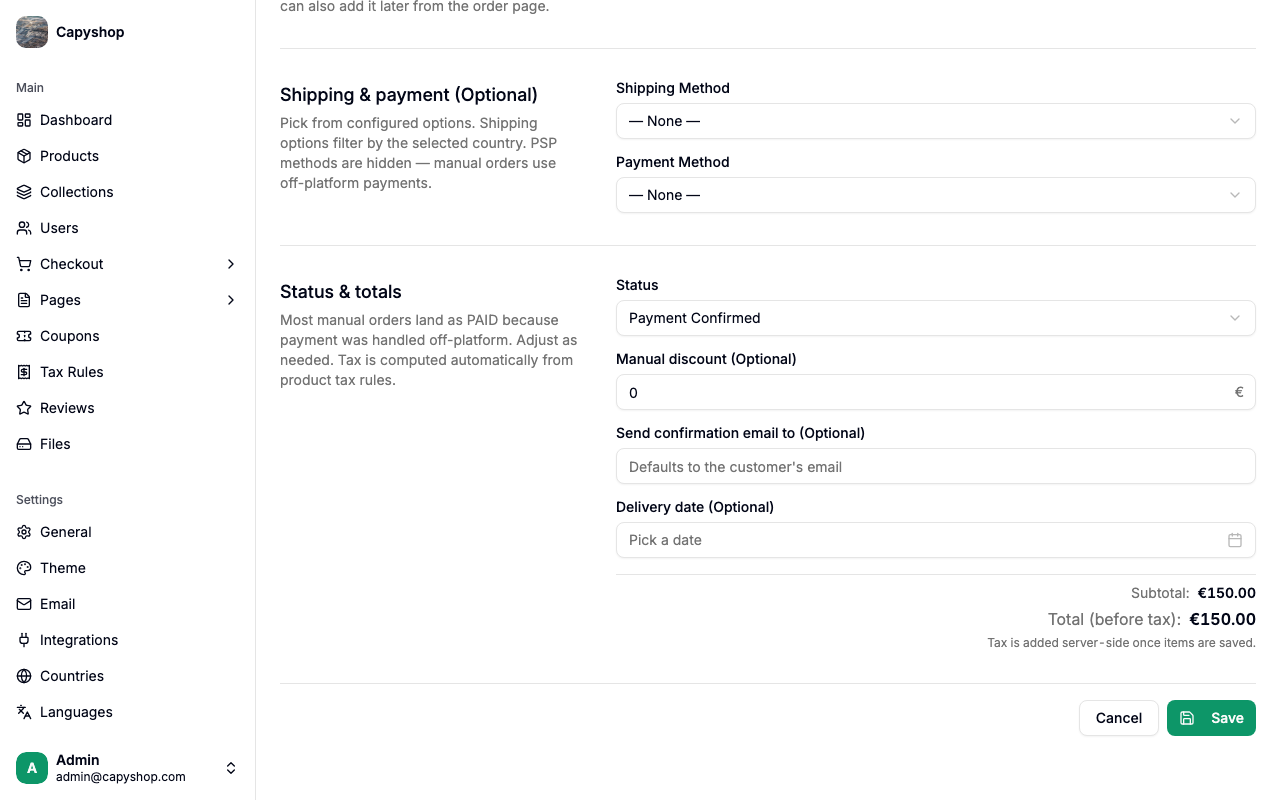
Step 4 — Shipping & payment (optional)
| Field | What it does |
|---|---|
| Shipping Method | Filters by the shipping address country. Auto-clears if you change the country and the option no longer matches. |
| Payment Method | Only offline methods (cash on delivery, bank transfer, etc.). Stripe/PSP methods are hidden for manual orders. |
Step 5 — Status & totals
| Field | Notes |
|---|---|
| Status | Defaults to Paid since the money already arrived off-platform. Pick any status that reflects reality. |
| Manual discount (Optional) | Flat amount to subtract from the total. Separate from any coupon. |
| Manual surcharge (Optional) | Flat amount to add to the total. Use for cash-handling fees, delivery add-ons, rounding, etc. Separate from the shipping cost. |
| Send confirmation email to | Override the contact email for the confirmation. Leave blank to use the customer's email. Nothing is sent if the customer has a placeholder email. |
| Delivery date (Optional) | Pick a date. Past dates are allowed for back-dating an order. |
The Total (before tax) preview shows subtotal + shipping + surcharge − discount. Tax is computed server-side once you click Save, using the country-specific tax rules for the items and the shipping address country.
Confirming the order
Clicking Save opens a "Create this order?" confirmation dialog. It reminds you that a confirmation email will be sent if the customer has a real email on file, and that after creation only the status can change — every other field is locked.
If you skipped any of the optional fields (shipping address, shipping method, payment method, delivery date), the dialog lists them in an amber Missing: warning. The warning does not block creation — click Create order to proceed anyway, or Go back to fill them in. After confirming, you land on the order's detail page.
Viewing an order
Click any order number in the list to open the order detail page. The page is divided into several sections showing all order information.
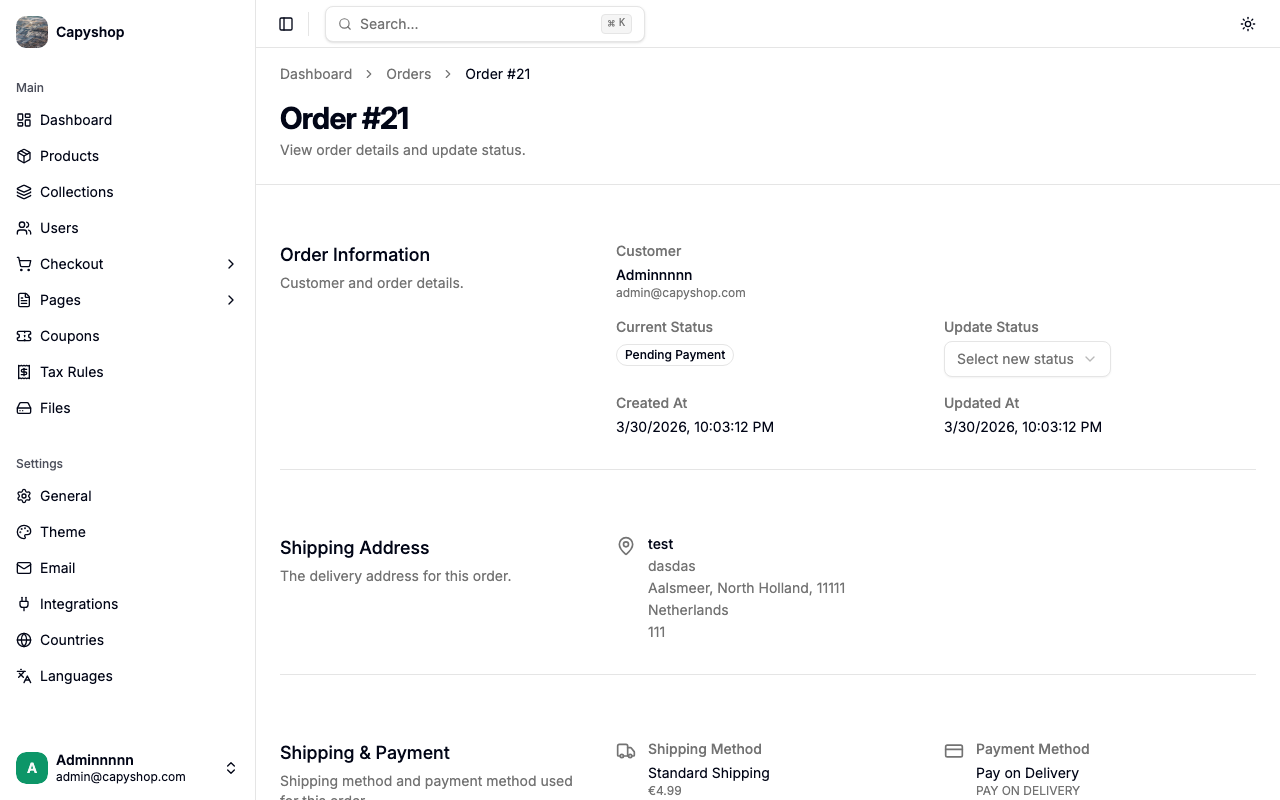
Order information
| Field | Description |
|---|---|
| Customer | Name and email of the buyer |
| Contact Email | The email address associated with the order |
| Current Status | Badge showing the current status |
| Update Status | Dropdown to transition the order to a new status |
| Created At | Timestamp when the order was placed |
| Updated At | Timestamp of the last modification |
| Delivery Date | Expected delivery date (if a shipping method was selected) |
Shipping address
Displays the full shipping address the customer provided at checkout: name, street, city, state, ZIP code, country, and phone number.
Billing address
When the customer checked Billing same as shipping during checkout (the default), the order detail shows a single block labelled "Billing same as shipping" instead of a duplicated card. When the customer entered a separate billing address, both blocks appear side by side so you can see exactly where the order was shipped and where it was billed for tax purposes. The billing country is what drove the tax calculation on the order.
Shipping and payment
| Field | Description |
|---|---|
| Shipping Method | Name of the selected shipping option and its cost |
| Delivery Date | Estimated delivery date based on the shipping option |
| Payment Method | Name and type of the selected payment method |
Coupon
If the customer applied a coupon code, this section shows the coupon code, discount type, and the discount amount.
Order items
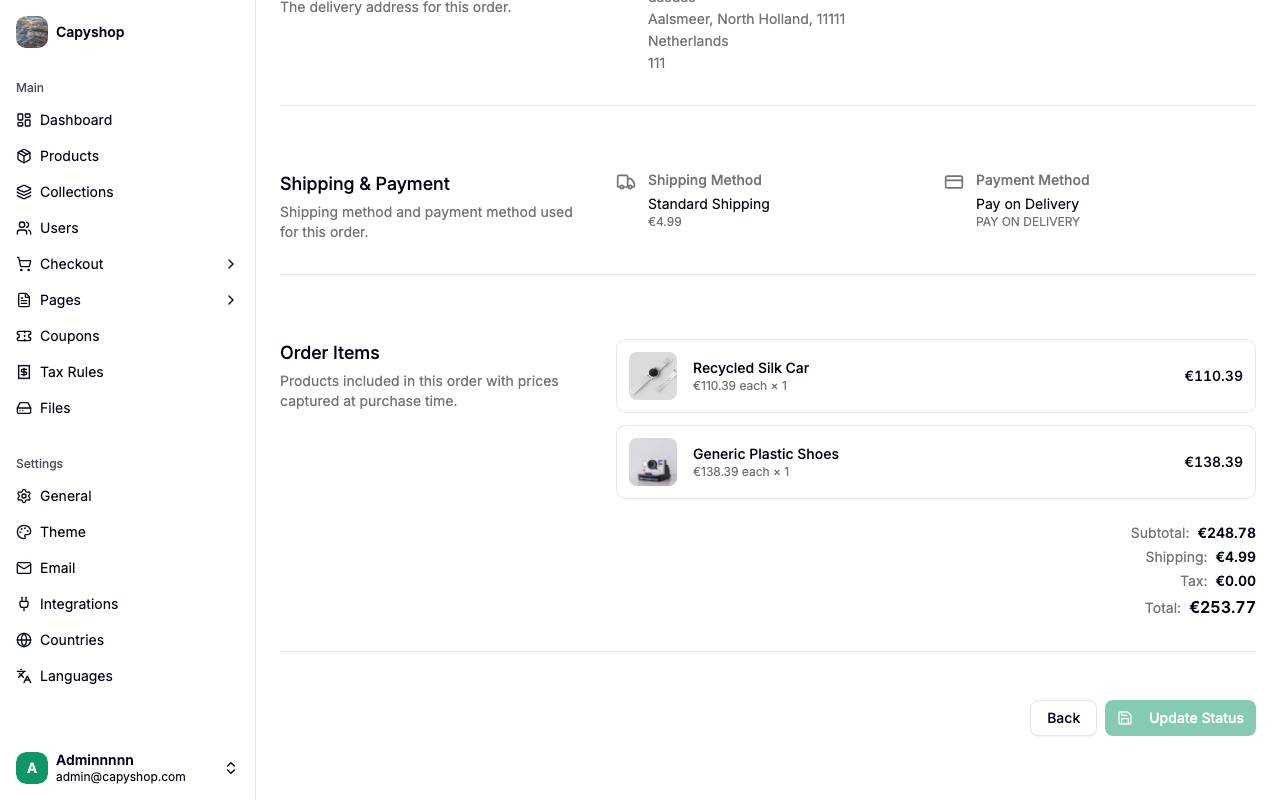
Lists every product in the order with its thumbnail image, title (links to the product editor), unit price, quantity, and line total. Below the item list you will find the financial summary:
| Line | Description |
|---|---|
| Subtotal | Sum of all item totals before extras |
| Shipping | Shipping cost (shows "Free" when zero) |
| Tax | Estimated tax amount |
| Surcharge | Manual surcharge applied at creation (if any) |
| Discount | Discount amount (shown in green) |
| Total | Final amount the customer was charged |
Order statuses
Every order has a status that reflects where it is in the fulfillment lifecycle. Statuses are displayed as colored badges throughout the admin panel and on the customer-facing order page.
| Status | Meaning |
|---|---|
| Pending Payment | Order placed, waiting for payment confirmation |
| Payment Failed | Payment could not be processed |
| Paid | Payment confirmed, ready to fulfill |
| Shipped | Order has been dispatched |
| Delivered | Order delivered to the customer |
| Cancelled | Order was cancelled (terminal) |
| Returned | Customer returned the order (terminal) |
| Refunded | Refund has been processed (terminal) |
Important: Orders in a terminal status (Cancelled, Returned, Refunded) cannot be transitioned to any other status.
Updating order status
On the order detail page, use the Update Status dropdown to select the new status and click Update Status. Only valid transitions are shown in the dropdown — you cannot skip steps or reverse terminal states.
Submitting opens a "Change status to {status}?" confirmation dialog. It highlights that if an email is sent, it cannot be recalled and shows a blue info box reminding you that the customer may receive a "{status}" notification email depending on your Settings → Email configuration. Click Change to {status} to apply the transition, or Cancel to back out.
Allowed transitions
| From | Can transition to |
|---|---|
| Pending Payment | Paid, Cancelled, Payment Failed |
| Payment Failed | Cancelled |
| Paid | Shipped, Delivered, Cancelled, Refunded |
| Shipped | Delivered, Cancelled, Refunded |
| Delivered | Returned, Refunded |
| Cancelled | (none — terminal) |
| Returned | (none — terminal) |
| Refunded | (none — terminal) |
Tip: For PSP (Stripe) payments, the transition from Pending Payment to Paid (or to Payment Failed, if the payment is rejected) happens automatically when the payment provider sends a webhook. You do not need to update these statuses manually.
Editing an order after creation
Once an order exists in the system — whether it came in through checkout or you recorded it manually — only the status can be changed. Every customer-facing field is frozen:
- Customer
- Items (product, quantity, unit price)
- Shipping address
- Shipping method and payment method
- Discount and surcharge
- Delivery date
- Contact email
Why is everything locked? As soon as the order is created, the new-order confirmation email is either sent immediately or queued to go out the moment payment clears. Changing any of those fields later would leave the customer holding a receipt that no longer matches their order in the system.
What to do instead: if an item, address, or total needs to be corrected, cancel the order (which restores stock) and create a fresh one with the right values.
Email notifications
The platform can send email notifications to customers at two points in the order lifecycle: when an order is first placed, and whenever you change its status.
New order emails
When a customer completes checkout, the system sends two emails (if enabled in Settings > Email):
- Customer email — a confirmation with the order number, items, totals, shipping address, billing address, and estimated delivery date. When the billing address differs from the shipping address, both are listed; otherwise a single block notes that billing matches shipping. Sent in the customer's preferred language.
- Store email — a notification to the store owner with the same order details. Sent in English to the email configured in your store settings.
These emails are controlled by the Send email on new order toggle in Settings > Email.
Status change emails
Each time you update an order's status, the system can send a notification email to the customer. Every status has its own toggle and optional custom text field in Settings > Email — you can enable or disable emails individually for Payment Failed, Paid, Shipped, Delivered, Cancelled, Returned, and Refunded.
Each email contains a status-specific message (e.g., "Your order is on its way!" for Shipped), the order number, item list, and order totals. If you provide custom text for a status, it appears as an additional paragraph in the email.
Tip: Status change emails are sent in the customer's preferred language. Configure your translations in Settings > Languages to ensure customers receive emails in their language.
How customers see their orders
Order confirmation page
After completing checkout, customers are redirected to the order confirmation page. It displays a thank-you banner, their order number, items, totals, shipping address, and payment method.
For PSP (Stripe) payments, the page shows a real-time payment status indicator that polls the server every 2 seconds for up to 30 seconds. Once the payment is confirmed, the banner updates to show a success message. If the payment fails, a red error banner appears instead.
Order history
Customers can view all their past orders from their Profile page under the Order History section.
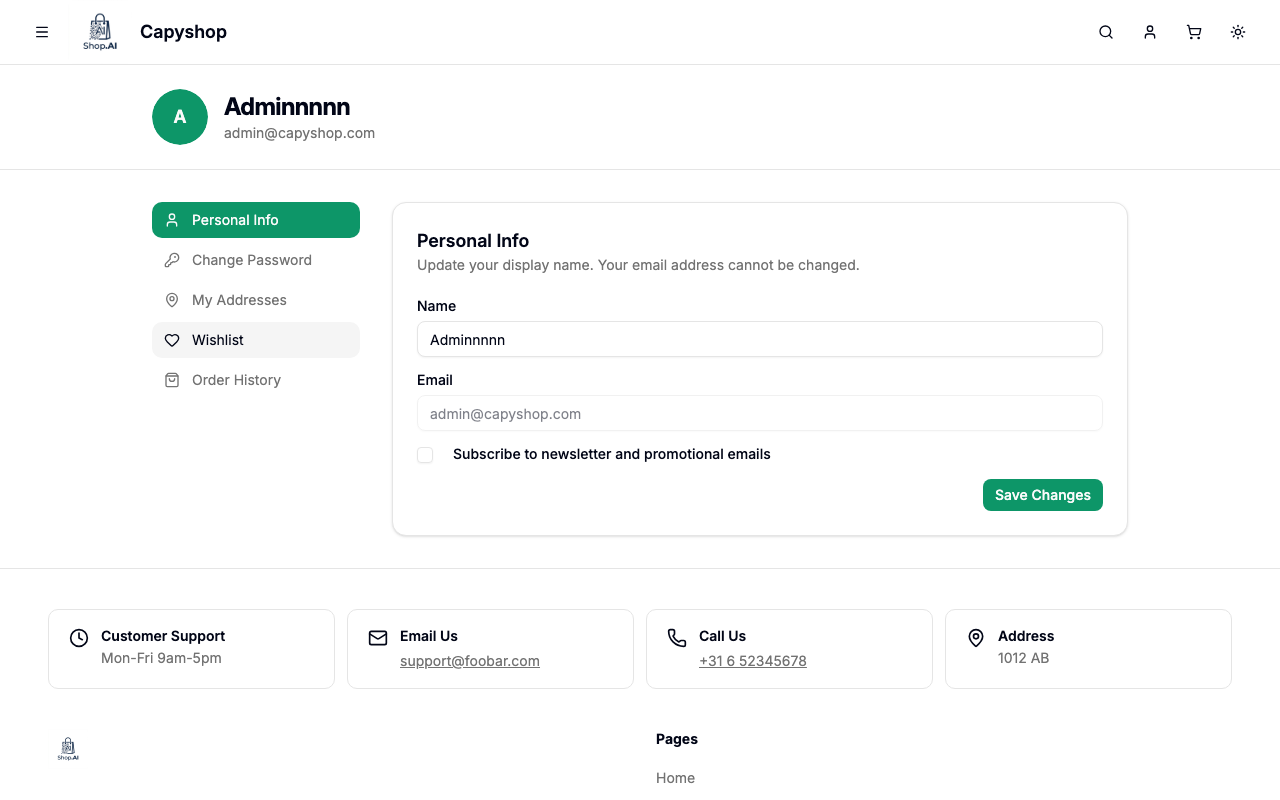
Each order card shows the order number, date, status badge, total amount, and a list of items with thumbnails. Clicking an order card opens the full order detail page. Orders are paginated with 5 per page.
How orders are created
Orders reach the database in one of two ways:
Through checkout. When a customer clicks Complete Order on the storefront, an order is created from the checkout snapshot with all items, prices, address, shipping, and payment details. Product stock remains decremented (it was reserved when the customer entered checkout), the cart is marked as completed, any applied coupon's usage count is incremented, new order emails are dispatched (if enabled), and the customer is redirected to the order confirmation page.
Manually. When you click Create manual order on the orders list, you fill in the customer, items, and optional shipping/payment fields yourself (see Creating a manual order). Stock is decremented the same way and the order lands directly in the list — no checkout snapshot is involved. Compared to checkout orders, the key differences are: (a) no checkout snapshot is created, (b) Stripe/PSP methods aren't available because manual orders are for off-platform payments, and (c) the confirmation email is skipped if the customer has a placeholder email (no address on file). Once created, both kinds of order are edited the same way — only the status can change.